Spaghetti Squash Chicken Parm

I think spring is finally here. The weather has been perfect, the flowers in bloom, and my allergies are in full swing. 

Life has been pretty hectic lately, and I’ve neglected to blog about. In a nutshell, baby Juni was born and I got to take her photos! Look at this precious babe! 😍

Juniper Sunshine


Then I went on a solo trip to Wisconsin where I met some amazing people and saw some beautiful landscape. It reminded me a lot of Maine but bigger!


I hit my first goal weight at the end of April, woot woot!

And then at the beginning of May I started a new job, which I’m totally in love with.

We put our garden in over the weekend…

Lincoln and I planting the onions.
I went into it strongly believing it would be a very small garden with limited produce. What we ended up with is a giant garden with one of everything. I’m a little concerned with the soil in our yard because it’s full of rocks and it’s very dry, by I’m staying positive! 

All that gardening made me hungry, and I had a spaghetti squash in the fridge that needed to be cooked. I saw a Tasty video on Facebook of spaghetti squash chicken parm. I had everything in the house to make it but I changed a few things to make it healthy. 

Poke holes in the squash before microwaving it.

It was a warm day and I didn’t want to use the oven any longer than necessary. Instead of breading and baking the chicken, I breaded and grilled the chicken!

Grind your favorite gluten free crackers into bread crumbs.
Use arrowroot powder, egg, and homemade breadcrumbs.

Scrape the sides of the squash down to get the spaghetti texture.

Add the marinara and chicken.

Add another layer of marinara and cheese (optional).

This is one of the best spaghetti squash dishes I have ever had. Even my 2 year old gobbled some up . I hope you enjoy as much as we did!

Spaghetti Squash Chicken Parm (serves 4)
Ingredients

1 spaghetti squash

1 jar marinara sauce (sugar and oil free preferred)

2 chicken breasts, cut into strips

1 cup mozzarella (optional)

Spritz of olive oil

Salt and pepper to taste

For the breading:

30 rice crackers (I used Blue Diamond Nut Thins)

2 eggs, beaten

2 tbs arrowroot powder

Italian seasoning of choice

Instructions
Preheat oven to 375f

Poke holes in the spaghetti squash and microwave for 6-7 minutes. This will soften it so it’s easier to cut. Let it cool.

Once cooled, slice the squash in half lengthwise as shown in the photos. Scrape out all the seeds. Spritz the squash with olive oil and sprinkle salt and pepper. Lay the halves face down on a baking sheet and cook for about 40 minutes, or until you can easily pierce the skin with a fork.

In the meantime, slice chicken into strips and set aside.

Put crackers of choice in a food processor and grind until they’re the same consistency of bread crumbs. 

Put the ground crackers, arrowroot powder, and eggs in separate dishes and bread the chicken. Dip the chicken in the arrowroot first, then egg, then the breading.

Place chicken on the grill and cook until they’re done.

Once the squash is done, scrape the sides down with a fork so you end up with the spaghetti texture. Pour about half the jar of marinara on top. Place the chicken strips on top of the sauce, then pour the remaining slice on top of the chicken. If you choose, sprinkle the mozzarella across the top.

Bake for an additional 10-12 minutes in the oven.

Enjoy! 


Spinach & Artichoke Dip

Mondays always come way too quickly, especially when you had the best weekend ever. The maternity photoshoot went incredibly well on Saturday and I can’t wait to share it with you! Sunday I snuggled my baby, made apple crisp, did a little shopping (found out I’m a size smaller than I thought, woo!), and finished some meal prep for the week. 

This weekend my focus was on snacks that go together quickly. I went with spinach & artichoke dip, partly because I had all the ingredients already and mostly because I was craving comfort food. In the past I’ve tried straining the cottage cheese first to reduce the water content in the finished product, but it just wasn’t as good. 


This dip is light and makes a great snack for any occasion. It keeps well for about a week and tastes just as good reheated in the microwave. Best part, you can whip it up pretty quickly with just a few ingredients and it makes a large portion. I hope you enjoy it!


Spinach & Artichoke Dip
Prep: 10 mins, Cook: 20 mins
Makes 4 cups
Shapers: P1FT, serve with veggies or nut thins.

Ingredients:

6 oz. frozen spinach
6-8 artichoke hearts, chopped
1 ½ cup cottage cheese
2/3 cup plain greek yogurt
1 tbs garlic salt
1 tbs nutritional yeast
Sprinkle of paprika

Instructions:
Mix the cottage cheese and yogurt until combined, then mix in the garlic salt and nutritional yeast until well combined. Stir in the artichoke hearts. Stir in the spinach. Sprinkle the top with paprika. Bake on 400 for about 20 minutes, or until top begins to brown and the dip is boiling. If your spinach is still a little frozen, take the dip out after 10 minutes and stir it again to break it up. Place it back in the oven for the remainder. It will be a bit watery on the top. You can drain it quite a bit using a turkey baster. Serve with veggies or your favorite rice cracker.

Crock Pot Apple Crisp (No Sugar – No Butter)

This whole 40 degree-cloudy-windy-naked-tree mess that is Maine right now reminds me of fall. And slow cookers. I feel like we should be carving pumpkins and burning Autumn Spice candles and sipping on freshly pressed hot apple cider. Where are the spring feelings I felt yesterday?! I’m so confused.


Lately I’ve been trying to focus more on living in the moment and not worrying about yesterday or tomorrow. Since it’s fall today, I couldn’t think of a better way to practice that than by making slow cooker apple crisp. The only catch is there isn’t any sugar. Or butter. Or oatmeal. I swear it’s delicious! It can be served as a warm dessert or breakfast, with or without the yogurt topping.


Crock Pot Apple Crisp
Makes 8 servings
Prep: 30 mins, Cook: 4 hours
*Shapers – P1FT, omit oil if needed.

Ingredients:
7 small apples – peeled, cored, and chopped into uniform chunks
1 tbs of coconut or MCT oil
1/2 lemon
1 tsp vanilla
1/4 cup xylitol
1 tbs apple pie spice
1/2 tsp cloves
1 tbs arrowroot powder

Topping:
3 packages of Melba Toasts
1 tsp apple pie spice
1/2 tsp cinnamon
1/4 cup finely ground xylitol (use coffee grinder if you have one)
2 tbs melted coconut or MCT oil

Optional:
greek yogurt (plain or vanilla)

Instructions:
Peel, core, and chop the apples and put in the bottom of your crock pot. Squeeze the lemon juice over the apples and stir them to coat. Stir in the coconut oil and vanilla. In a separate bowl, mix the xylitol, apple pie spice, cloves, and arrowroot powder until well combined. Pour mixture over the apples and stir until they’re evenly coated.

To make the topping, combine all ingredients in a food processor and pulse until the Melba Toasts are in small chunks but not ground up too finely.

Sprinkle topping on top of apples. Cook on low for 4 hours or until it’s bubbling on the sides and apples are very tender.

Optional:
Put some greek yogurt of choice in the freezer for 15-20 minutes before apple crisp is done. Don’t leave the yogurt in the freezer too long or it will freeze solid. Top the apple crisp with yogurt and garnish with cinnamon and apple peel. Enjoy!

Chocolate Covered Berries Smoothie

Just because it’s 8am, doesn’t mean you can’t have chocolate. When I was a kid, my favorite thing to drink in the morning was chocolate milk. I still love chocolate milk, but the scale doesn’t. So, improvise we must. This morning treat comes packed with benefits like antioxidants, iron, protein, and fiber to name a few.


I’m excited this morning because I get to do a maternity shoot in the forest with the most beautiful mama! It’s an F16 kind of day but get this: it’s MUDDY! Muddy in Maine at the end of February. Dear Mother Nature, we were supposed to be taking these photos in a winter wonderland…what gives? You know what, I can forgive as long as it’s true that spring is almost here.


Anyway, back to the chocolate. I find the fruit to chocolate ratio perfect, and the vanilla yogurt gives it enough sweetness. If you want more sweet, I suggest adding a tablespoon of xylitol or 1-2 of those heavenly Medjool dates.


Chocolate Covered Berries Smoothie
Makes 12 oz.

1/2 cup vanilla greek yogurt (I prefer Triple Zero brand because it’s sweetened with Stevia)
1/2 cup water
1 cup frozen mixed berries
1 big handful of spinach
1 1/2 tbs raw cacao

Blend all ingredients together until smooth, then taste test. Add sweetener if desired. Enjoy!

That’s all for today, I have an adorable baby belly to go take photos of! They don’t know the sex of the baby, but my bets are on boy. I’m smitten!

Have a happy weekend, everyone! Let me know what you think.

Kayla

Mini Raspberry Cheesecakes with Chia Cinnamon Crust (Sugar Free, No Cream Cheese)

Faux cheesecake is not to be trusted! That was my firm belief up until 48 hours ago, when I went against my belief and messed with my classic cheesecake recipe. I had a craving, and the only thing that would satisfy it was thick creamy delicious cheesecake. I’ve tried to make an alternative cheesecake that was free of sugar and cream cheese and I did come up with something, but it tasted more like a custard and not a cheesecake. And that was when I decided not to mess with it again…that is, until I came across how to strain greek yogurt! My life has changed forever. Making desserts that are sugar free and health conscious isn’t easy. Sometimes you strike gold, sometimes (most times) you’re left craving things even more than when you started. This time, I struck gold and I’m begging you to try this recipe! I can’t believe how smooth this cake is!


This will require a bit of patience and prep. I’ll start off by re-posting the method for making the “cream cheese”. You absolutely must do this in order for the cake to come out right. There are a ton of variations on how to do it, but here’s what I did:

Cream Cheese
Prep: 24 hours

You will need:
Large container with tight lid
Cheese cloth
(1) 32 oz container of plain greek yogurt (I uses Fage 0%)

Instructions:
Scoop the yogurt out onto the cheese cloth, and strain it over a large bowl for 24 hours in the refrigerator. Suspend the yogurt above the bottom of the by using a bowl with a lid and closing the cheesecloth up into the lid. All the water will drain out of it and you’ll end up with a very thick consistency like cream cheese.

IMPORTANT NOTE!! ** This recipe contains xylitol. Xylitol is deadly to animals. Keep it far far away from your pets!**

Mini Raspberry Cheesecakes with Chia Cinnamon Crust
Yields (3) 4” mini cheesecakes.
Shapers this is P1 FT
Prepping: Prep time is 1 hour, cook time is 25 minutes, plus 24 hours for the cheesecake to set/chill.

Crust (Adaptation of Shape Muffins by Jessie Pierce Crites):
1 c. freshly ground flax seed
½ c. chia seeds (don’t soak them)
1 ½ tsp baking powder
1 tsp baking soda
1 tsp apple pie spice
½ tsp cloves
Âź tsp of ginger
Pinch of salt

2 eggs
Âź c. xylitol
1 ½ tbs melted coconut oil
Âź c. plain greek yogurt
Âź tsp vanilla

Crust Instructions:
Mix the dry ingredients together and set aside. Mix the wet ingredients together and add it to the dry ingredients. Line an 8×8 baking pan with parchment paper and scoop the batter into it. Bake at 350 for about 20 mins or until done. When finished, set aside and let cool while you make the filling. After the crust has cooled, break about half of it off and pulse in a food processor with about 1 tbs of coconut oil. Press the crumbs to the bottom of your cheesecake pans. You’ll likely have leftover crust.

Topping:
1 package of melba toasts
½ tsp apple pie spice
Âź tsp cinnamon
2 tbs melted coconut oil
1/8 c. finely ground xylitol (use coffee grinder for this if you have one)

Topping Instructions:
Grind all ingredients together in a food processor. Pulse until the melba toast is coarse and set aside.

Filling:
1 1/2 cup homemade cream cheese (the greek yogurt you strained)
1 ½ egg
1 cup xylitol
Âź – ½ frozen raspberries, cooked down

Filling Instructions:
Cook the raspberries down in a small sauce pan over medium and add a bit of xylitol to sweeten it if you wish. Set aside.

Mix the cream cheese and xylitol on low until combined. Add one egg until incorporated, then add in the other ½ egg. Fold in the raspberries gently. Don’t over beat it, but make sure everything is mixed thoroughly. The batter will be runny.

Scoop the filling into the cheesecake pans and sprinkle with the topping.

Bake at 350 for 20-25 minutes, or until the filling is not jiggly. You may see a little bit of browning on the sides. Let cool on the stove top, then chill in the fridge for 24 hours like you would a real cheesecake. Do not skip this step, trust me. I know it’s hard to wait, but it makes a huge difference! Top with fresh or frozen fruit and serve chilled, and with a cup of coffee. 😉

This faux cheesecake will do. Given how smooth it is, and the fact that it didn’t crack, I probably won’t make another cheesecake with cream cheese again!

I hope you like it!

Kayla

Citrus Chicken Teriyaki Salad (Oil & Sugar Free Glaze)

If you’re like me,  you could eat salad for lunch every day. Maybe even twice a day. But after 2 weeks of the exact same salad, I get bored. It’s hard for me to find a salad dressing that I can actually eat due to all my restrictions, so when I create one that tastes great, it’s cause for celebration and sharing! This is more of a glaze than a dressing, but it gets the job done. I hope you enjoy it too!


Citrus Chicken Teriyaki Salad
Serves 1
*Shapers: this is P1 FT approved.

Ingredients:
Precooked chicken breast (however much you want, grilled or breaded with nut thins)
1 handful spring mix
1 clementine, divided in half
5 golden cherry tomatoes
2 tbs coconut aminos
1/2 tbs arrowroot powder

For the glaze:
Put coconut aminos and arrowroot powder in small sauce pan and whisk together on low-medium heat. Squeeze 1/2 of the clementine juice into the glaze. Whisk until you reach the thickness you want. Drizzle over salad and enjoy warm!

Kayla

No-Bake Dark Chocolate Tarts

If you’re reading this I must be alive again. It’s been a few days since I posted. My coffee maker broke, so I was pretty much dead that whole time. All is well now though, because I’m the proud owner of a new mediocre coffee maker. Make no mistake, a mediocre coffee maker is a million times better than none at all. Where I live, it’s at least a 10 minute drive to the nearest generic gas station coffee and 30 minutes to anything decent. I know, I know…tough life. I accept your sympathy.
IMG_2546.JPG

While I was dead, I experimented a little with this vegan chocolate tart recipe. Needless to say, it brought me back to life, so I think it’s worth sharing. It’s the richest and creamiest chocolate ever and is easily my new favorite treat and Lincoln’s, too!

I really don’t know where to place all these pictures so I’ll just leave them scattered about like so…


12524098_10208167065316504_8989722084318894378_n

If nothing else, they are beautiful!

Dark Chocolate Tarts
Makes 8 – Takes about 20 minutes.


Ingredients & Directions:
Crust

3/4 cup coconut flour (you could use almond flour too)
4 tbs ground hazelnuts
5 tbs coconut oil, melted
2 1/2 tbs cacao powder
3 tbs maple syrup
Chocolate Filling
1/3 cup coconut oil, melted
1/2 cup cacao powder
1/4 cup unsweetened coconut milk (canned)
5 tbs maple syrup (add more to taste)

Crust:
If you have silicone baking cups, use those. If not, regular cupcake tins should work fine. Slowly warm coconut oil until melted on the stove but do not let it get hot. Set aside to cool. While the coconut oil is cooling, grind whole hazelnuts in a food processor. Whisk together the coconut oil, cocoa powder, and syrup until well combined, then add in the rest of the ingredients until the crust forms. I like the crust to be a little on the thin side, but if you prefer thicker, just add more flour. Spread a little coconut oil along the sides of your molds before filling with the crust. This will make it much easier to peel them off before serving. Press the crust into the molds and put in the freezer to harden while you make the filling.

Chocolate Filling:
Warm coconut oil on the stove, but again do not let it get too hot. Whisk the rest of the ingredients in until smooth. Pull out your crust and fill with the chocolate. Top with sliced almonds or chopped hazelnuts and fresh fruit of your choice. I prefer strawberries or raspberries. Chill covered for an hour or until solid. Peel the molds off and serve cold.

Processed with VSCOcam with 5 preset
Top with hazelnuts, almonds, or any other nut of choice, then refrigerate.
If you like super rich dark chocolate, this is for you! I hope you guys enjoy & let me know how it turns out or if you have questions. 🙂

Kayla


Sweet Potato Pad Thai

I have been chatting with Bluehost tech support for over an hour about this WordPress thing, and I feel even more confused than before. I don’t know anything about how to run a blog and I need some serious help! Please bear with me while I figure this out. I suppose I have all the time in the world to chat with this nice person, because I just put on a pot of chili that requires a lot of simmering…like 4 hours of simmering. It’s 10pm. The crockpot is ready to report for duty on this one I think. Or maybe I just need some coffee. 😉

So anyway, about a year ago I got a Paderno spiralizer and I am still completely obsessed with it! If you haven’t spiralized, I’m here to tell you that you must start now. You can spiralize so many different foods; sweet potato, turnips, beets, broccoli stem, carrots, ginger, apples…it’s so much fun and I have so many more recipes to share!

This summer I made a Sweet Potato Pad Thai and it was the most delicious “pad thai” I’ve ever had. This recipe is an adaptation of Kaylee’s recipe at Lemons & Basil. I made a couple small adjustments of my own, but man o man what a genius idea! Be sure to head over and check out Kaylee’s recipes too.

Processed with VSCOcam with 5 preset
Here’s my version and I hope you enjoy it!

Sweet Potato Pad Thai
Serves 4

Ingredients:

Peanut sauce:
1/4 cup natural peanut butter, creamy
1/4 cup Sriracha sauce (use 2 tbsp if you prefer mild over hot)
1/3 cup canned coconut milk, unsweetened
3 tsp sesame oil
1 tsp apple cider vinegar
1 1/2 tbsp real maple syrup
1 tsp tumeric

Noodles:
3 spiralized sweet potatoes (I used the angel hair blade setting on my Paderno)
2 carrots, spiralized then chopped into small length pieces
2 red bell peppers, thinly sliced
2 handfuls of bean sprouts
1 handful of sugar snap peas
Âź cup vegetable broth
1/2 cup dry roasted peanuts (unsalted)
3/4 cup edamame
salt to taste

Optional:
1 lb chicken breast or shrimp if you wish
1/2 white onion, chopped – I have made this both with and without, and I think it’s good either way.

Directions:
If you’re going to add chicken, cook that through first and set aside. I prefer to poach the chicken for this particular recipe, but any cooked chicken will do.

Sauce: Combine all the sauce ingredients in a blender and blend until smooth. Add more or less sriracha to taste. Put sauce in a small sauce pan and set aside.

Then prep everything. This recipe moves quickly so you need everything ready to go before you turn the heat on. Spiralize the sweet potatoes and carrots, slice the peppers, measure out the broth, peanuts, and edamame. Set everything aside and go back to your sauce. Turn the heat on low and have a whisk ready. You’ll want the sauce to be warm when it’s time to add it to the noodles. Whisk the sauce occasionally.

For the noodles: In a large pan or wok, add vegetable broth and let warm up. Then add in the sweet potato, carrots, and peppers, salt, and turn the heat up to medium high. Toss the veggies continuously like a stir-fry until the peppers and carrots become tender. The sweet potatoes will get soft, but not really tender like the other veggies. Add in the snap peas and stir for a couple more minutes, then add in the peanuts and edamame, stirring for 3 more minutes. Now, add in the chicken and peanut sauce and stir mixture until the sauce has coated everything. **You may keep the sauce separate and pour over your portion of the noodles as you go if you wish. I find that option best if you’re planning on having leftovers. Dish the noodles and top with fresh beansprouts and a very little drizzle of sesame oil. Enjoy!


As always, I’d love to hear what you think!

Kayla

Anti-Inflammatory Green Smoothie

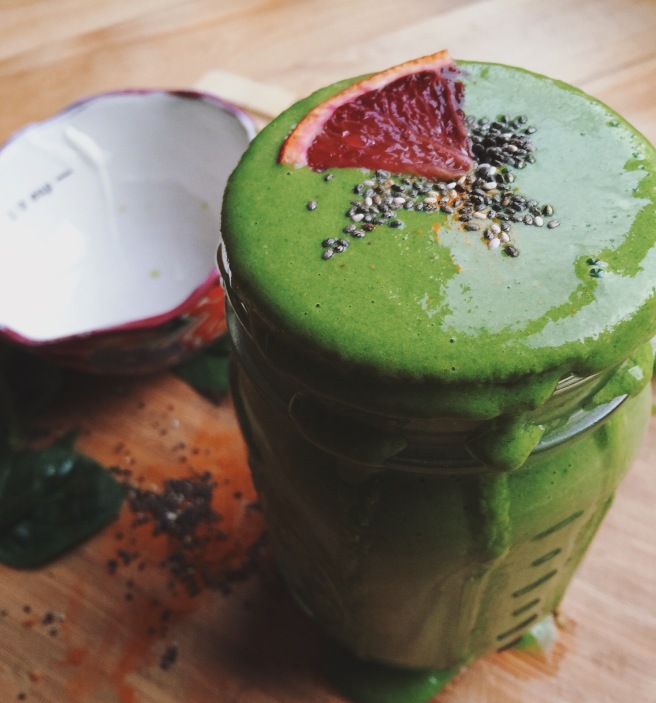
Why does everything have to be such a controversy? Today’s topic: green smoothies. “Too much sugar”, “Loses nutritional value”, “Green smoothies are the nectar of the Gods!”, “There’s nothing healthier!” While I agree that this has potential to be a (natural) sugar blast in a cup, I love green smoothies and everything about them.

I eat no more than 2 servings of fruit each day, and usually those servings are blended up into my morning treat. I can whip them up right before I head out the door for work and know that I’m getting a healthy dose of fruits, vegetables, and protein before I even punch in. I love that they hold me over until lunch time. I love the pretty shades of green, and I really love how my 2 year old sucks them down too, although it must be sipped out of the blue crazy straw or all bets are off.

Processed with VSCOcam with k2 preset


This is my go-to anti-inflammatory smoothie that I make and drink each morning to help reduce any inflammation I might have right off the bat. There aren’t a lot of ingredients, and I have chosen fruit with as low acidity as possible, as well as greek yogurt to add some protein. You can play around with this any way you like – you can trade the yogurt for tofu or even cottage cheese, and you can add different spices to it.

Processed with VSCOcam with k3 preset

Anti-Inflammatory Green Smoothie
Makes roughly 20 oz.

Ingredients:
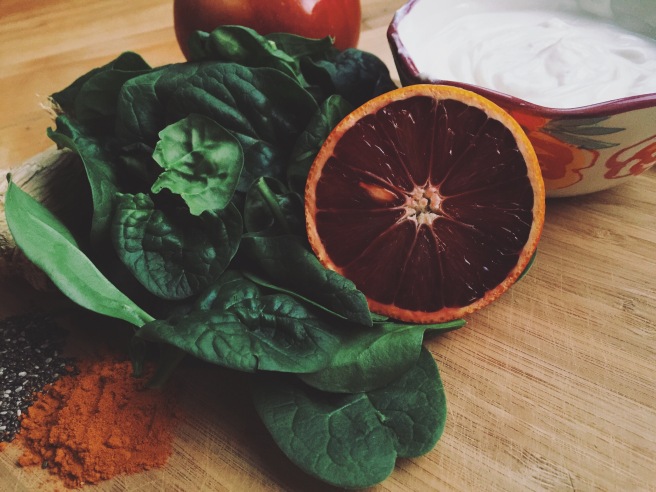
1 big handful baby spinach
1/2 blood orange
1 small/medium apple of choice
1/2 cup greek yogurt
1 inch turmeric root (more or less to taste)
1-2 thin chunks of fresh ginger (more or less to taste)
5 ice cubes
Dash of water if needed
Optional
2-3 drops of liquid Sweet Leaf stevia for extra sweetness
1 tbs chia seeds or 1 tbs dry oats

*Before I get to the directions — I’ve tried to do this in a personal blender, but there are too many ingredients to do it in one shot. However, it can be done in portions. Start by blending the spinach and yogurt only and add water if you need to. Then add the rest of the ingredients (ice last) and blend until smooth.
Also, Oikos Triple Zero Greek Yogurt by Dannon is made with stevia leaf extract and I consider it fair game for my smoothies. Sometimes if I want extra fruity flavors I put the Triple Berry Flavor in place of the plain. It’s delightful! Be aware that there is also chicory root in it and that may cause digestive problems for some people. 

Directions:
Peel and break apart the orange, set other half aside for the next morning, or a snack for later. Slice your apple, peel if you wish. I leave my apple peel on. Put ingredients in the blender in this order: yogurt, water, spinach, apple slices, orange slices, chia seeds, turmeric, ginger, ice. Pulse until the spinach starts to get sucked in, then blend on high until smooth and ice is completely ground up. Taste test, then add in stevia if you need a little sweetener. I think the apple makes it sweet enough, so I usually skip the stevia.

I hope you enjoy this recipe as much as I do, and it gives you a little extra boost. Please be sure to let me know what you think if you try it!